August 22, 2014

Three Ways to Fix (or Prevent) Your Worst Painting Nightmares

One might assume while looking through Ask for Roses that every piece of furniture I touch magically turns out how I envision it the first time...let me assure you...it doesn't!

There are all kinds of mistakes that occur--no matter how much planning and care go into a project, human error just wins sometimes.  And that is okay.  One of the benefits of my "Trash to Treasure" rehabs is that I am working with a piece of furniture that I received for free, so it has no sentimental or monetary value to me.  This gives me a little more courage to expiriment and not obsessively worry as much as I would if I were painting a table my mother gave me.

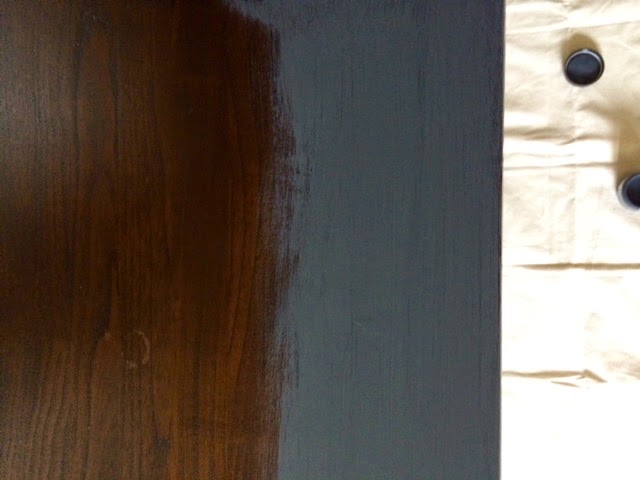
Case in point: the Graphite and Pure White Side Table.  My original idea was to paint the bottom of the legs gold.  I didn't want to use gilding wax, partly because I didn't think that would have the right effect and partly because the tiny pot of gilding wax costs $20.  My solution was to order an inexpensive craft paint that was meant for wood.  The reviews assured me that I would experience a glimmering metallic effect after painting and it worked beautifully on wood.

Would you like to see how that reality played out?

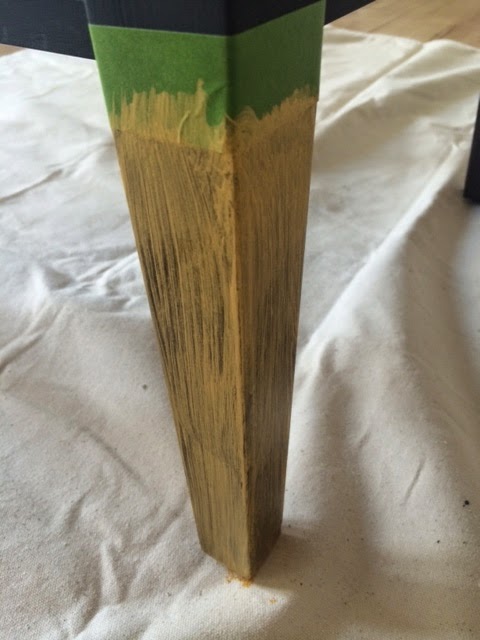
Translate: streaky matte gold paint brush lines.  And this is after two coats. Fortunately, I had the thought to just paint two sides of one leg and see what happened instead of painting all the legs.  Which brings me to:

 Tip #1: If you're experimenting with a new technique, start in a small area first.

The fix for this?

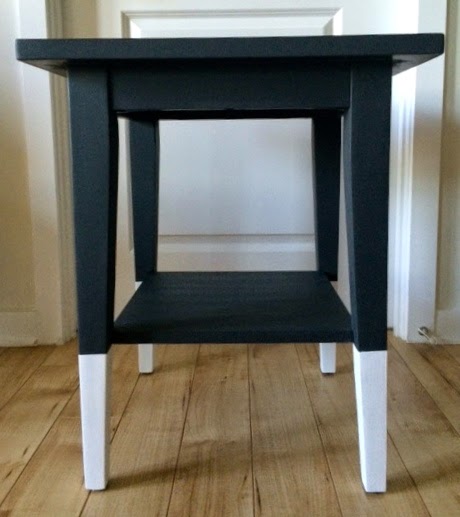
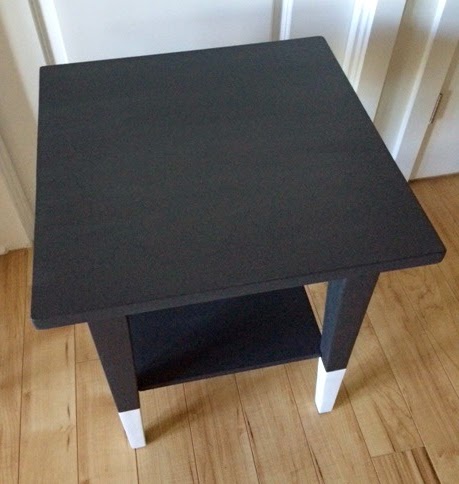
Two quick coats of Annie Sloan's Graphite on this one leg and then two coats on Pure White on all the leg bottoms.  And the result?  A table that looked great and an unnoticable once-was-gold leg.

Tip #2: Be flexible with your vision.

Instead of throwing a tantrum and trying to figure out a way to make the gold work...I just re-evaluated, made the decision to use white (because I had a can of white already available) and no one was the wiser.  In fact, if I wasn't writing this post, would you even know?!


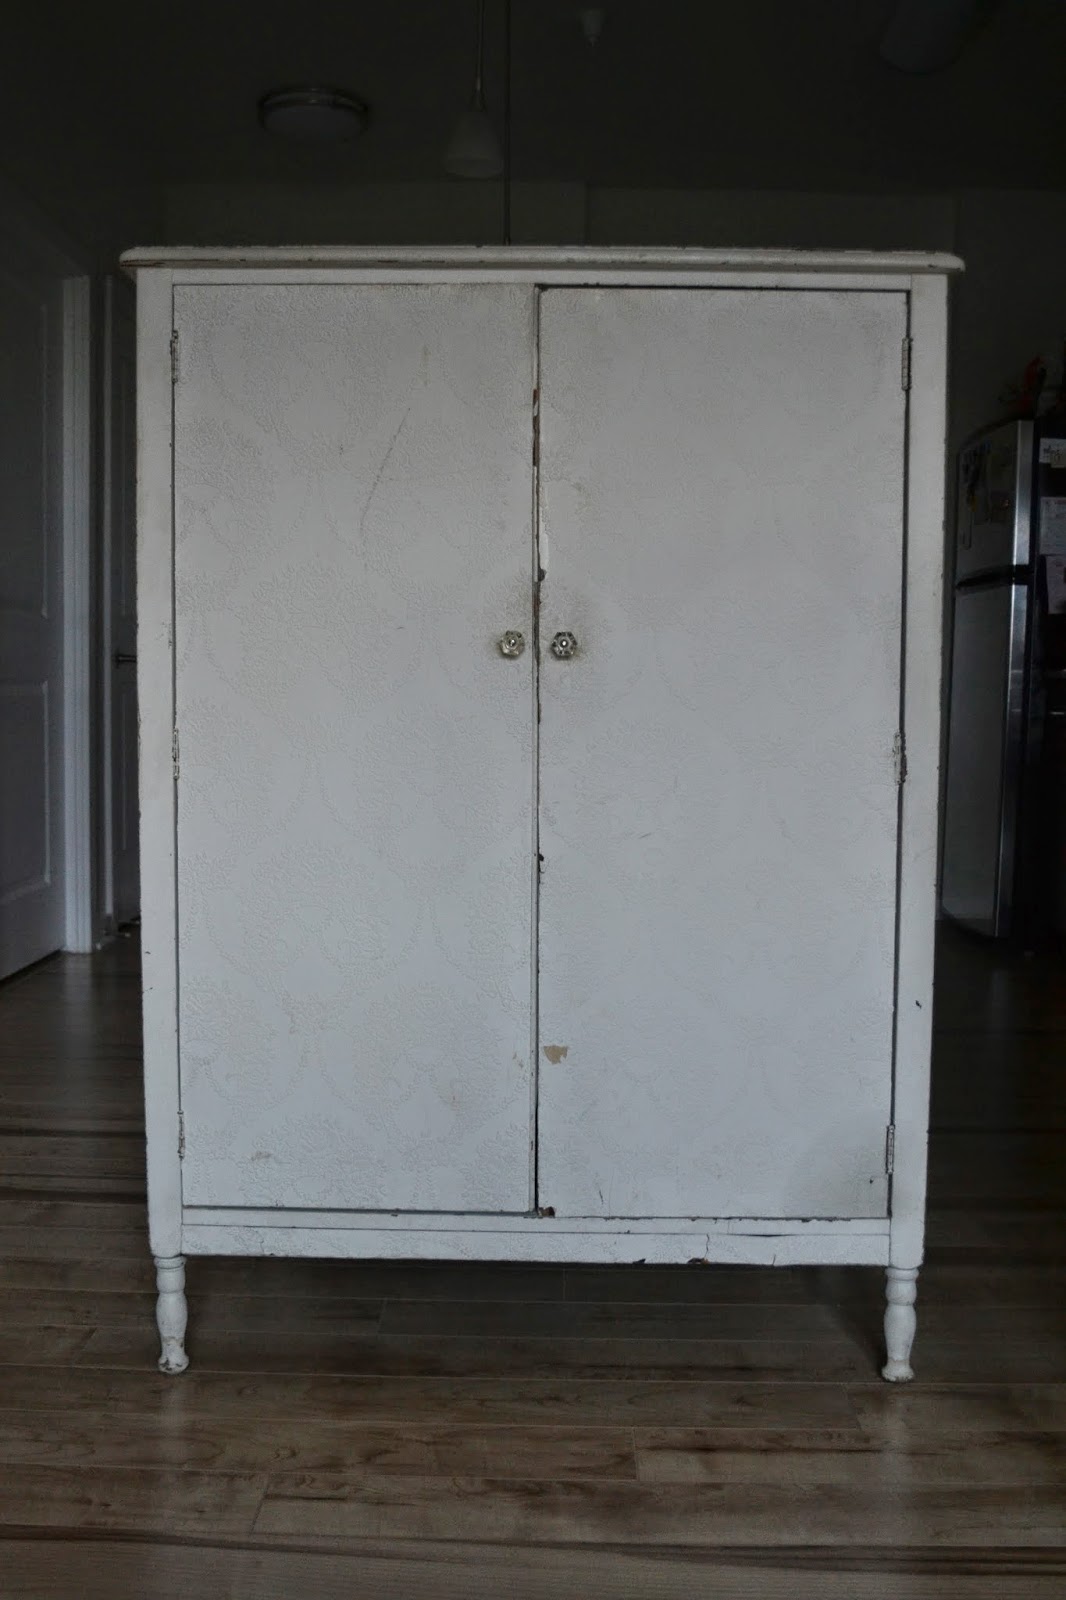
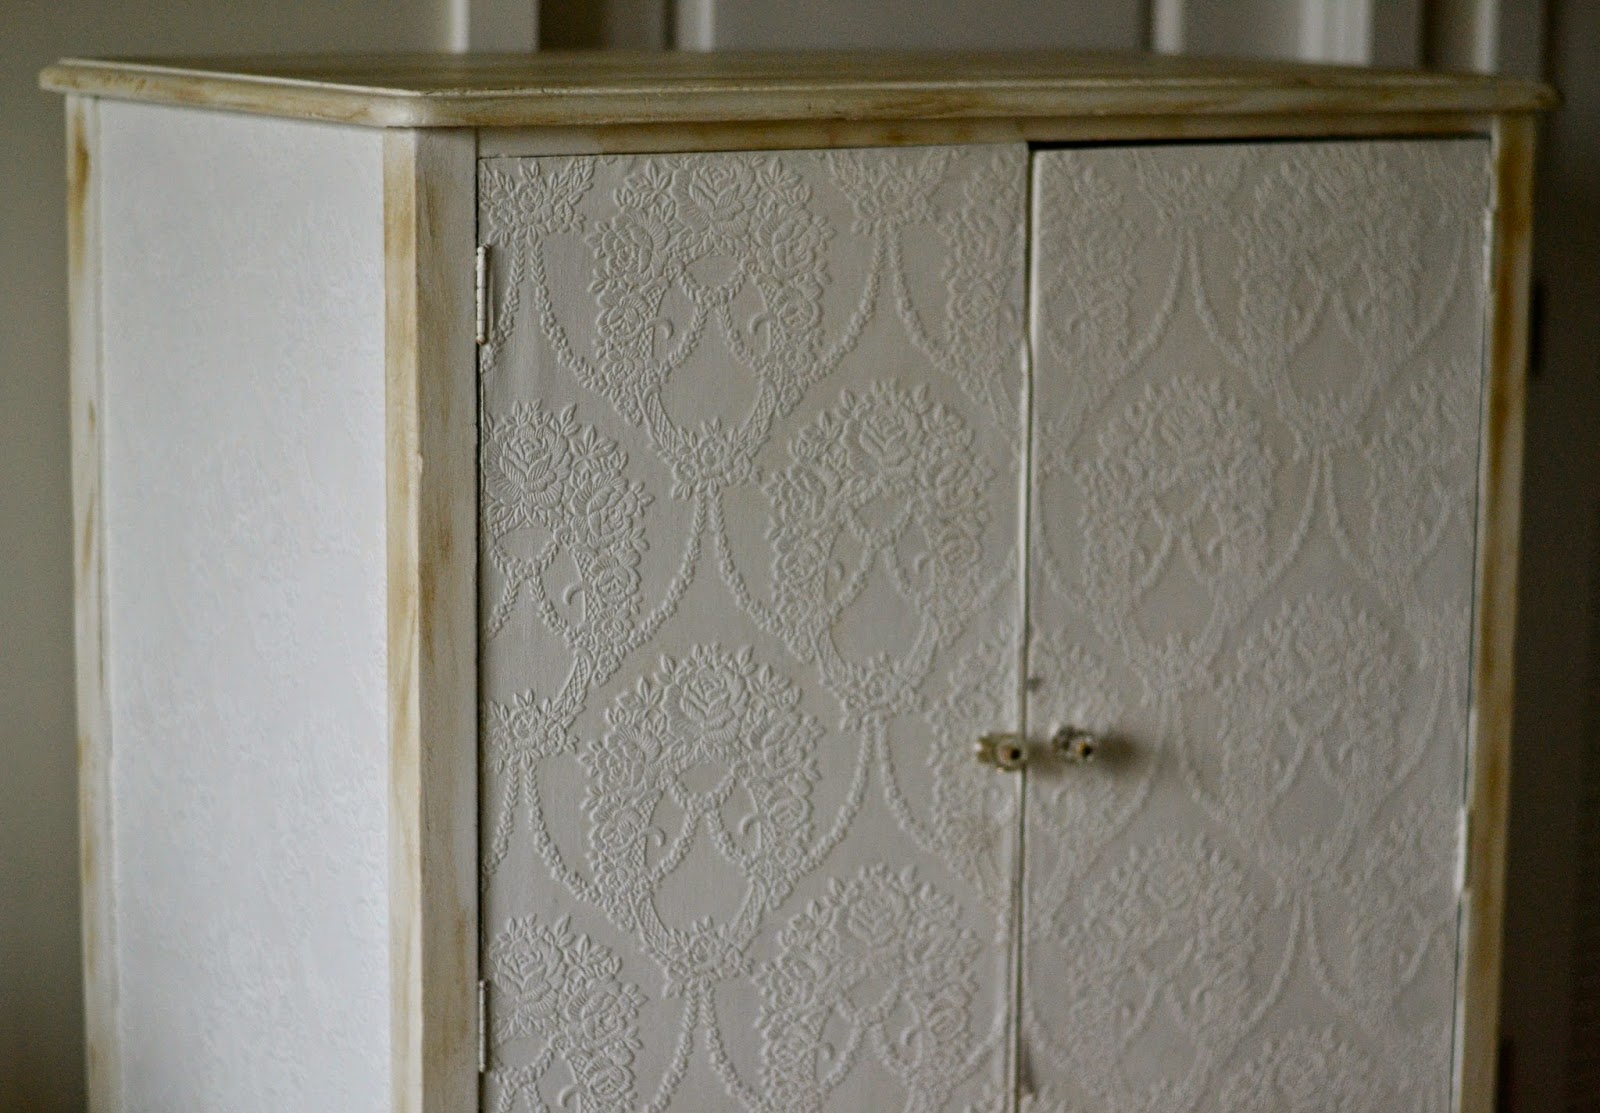
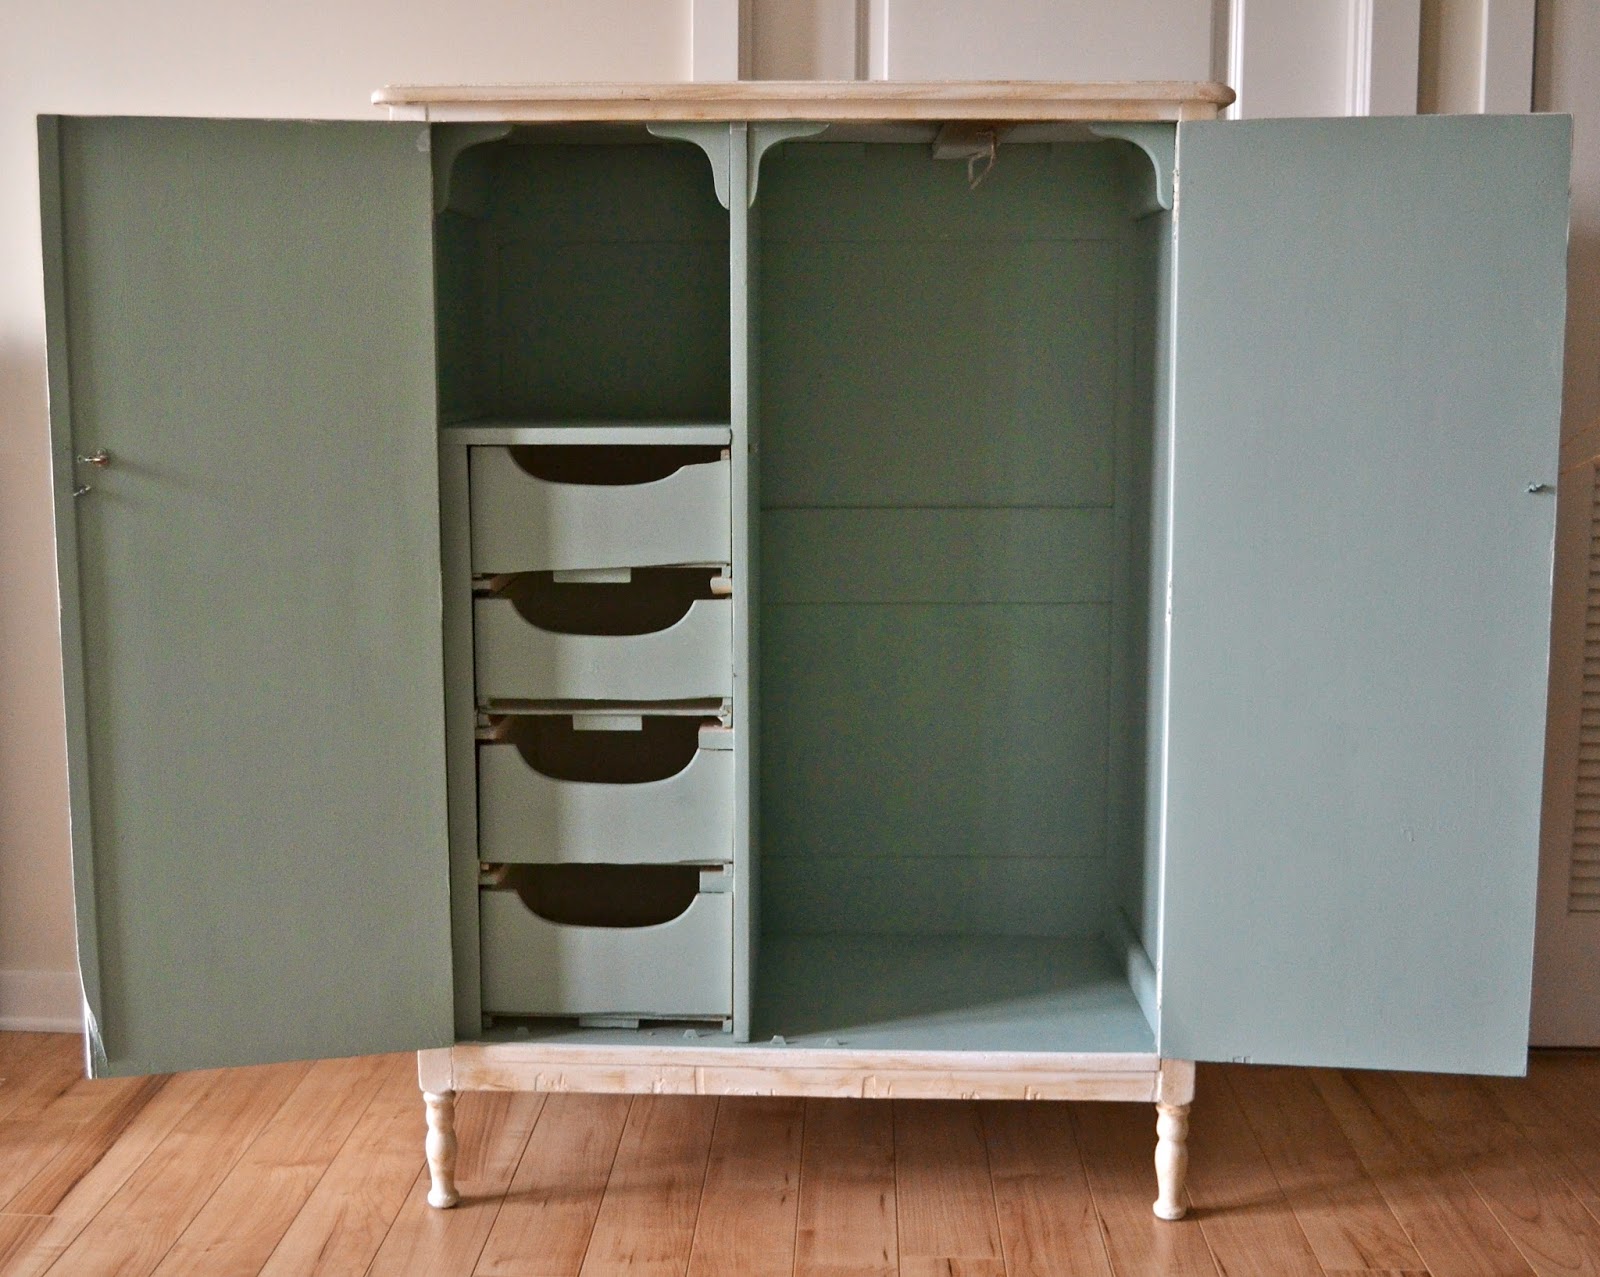
And moving on to one of my favorite pieces of all time: the Washed Armoire.  However, there was a moment when this was not one of my favorite pieces of all time.  And that moment occurred as Kern was putting the doors back on the front (we had removed them to repair the hardware and to paint) and we realized that I had painted the front of the door Louis Blue and the French Linen/Paris Grey wash was on the inside.

Cue black clouds and silence.  To make matters worse, I was almost out of paint.  Lots of deep yoga breathing (that's not technically a tip, but consider it a bonus).

Tip #3: (Preventative) If you take furniture apart, label fronts, backs, sides...anything you are painting different colors.  Even if you think there is no way you could possibly confuse it.

I pulled all of my supplies back out and went to work re-painting the front and back.  I had just enough to finish both sides!


Which door was the disaster?!  (Hint: the one on the left!)

The bottom line to the great world of crafting and DIY is that some things will go wrong.  Some projects will not turn out as planned.  You may even have to walk away, leave the project for a day or two and return to it with a fresh mind.

If you're lucky, maybe you'll even have a few good stories to tell!

August 20, 2014

My Desk at Work: Adding some Flair

For the past five years, my desk at work has looked the same.  I recently decided that I wanted to change a few small features and update my space.  After all, I do spend 45 + hours a week seated in this spot--the least I can do is be surrounded by items that bring me happiness!

Here's the before: nothing wrong with my area, it's just plain!


I typically invest in a new calendar every January, but somehow I let that slip by the wayside this year and reverted to cutting up a calendar I printed off the internet and taping it to my computer monitor.  Very classy, I know.  I knew that I wanted to incorporate some photos from our recent engagement and wedding and enjoy those, but it was difficult to pick just one!


The perfect solution to this problem was to make a calendar that incorporated several of my favorite photos ensuring that I could remove my cut up/taped on calendar and enjoy a new photo each month.

After a thorough internet search, I chose to use Shutterfly to make my calendar.  After browsing through the options, I decided on a simple design: one photo on the left and a basic calendar set up on the right.  I was impressed with Shutterfly's desk calendar selection. Their custom calendar templates enable you to do photo collages, add text and use different filters to create the design and look that you like best.  You can even begin your personalized calendar in the current month...if you want to start enjoying it right away.

I picked all photos of our engagement and wedding...it will be fun to enjoy them over the next year!  Another 'note to self' from this simple project: these calendars would make fantastic gifts!  Filing that one away for later...


Next up: add a little green!  Since the wooden desk belongs to my employer and I can't exactly Chalk Paint my desktop, I decided to paint the pot from an Ikea plant with Annie Sloan's Coco and use some gold gilding on the rim to give it a little sparkle.


Did you know that Chalk Paint can be used not only wood, but also plastic, metal and stone?

I took my standard black post-it dispenser, painted it with Annie Sloan's Pure White and then used gold gilding to rub over the finish.  The result was a funky-distressed-gold post it holder!  Anything is more fun when it's gold--especially when it used to be black plastic!


I have so many more ideas for a desk space, but alas, I must keep my work space in the office professional looking.  However, if you have the luxury of having your own space at home, here are some more suggestions and ideas to get your creative juices flowing for a simple and economical desk makeover:

*Use a lamp - overhead lighting can be so harsh, but a lamp allows you to add character to your space while also bringing more lighting into your area
*Spray paint your scissors, tape dispenser, letter opener and other office supplies gold
*Invest in a candle
*Stack your favorite books under your computer monitor or find some fun bookends to keep inspiration at your fingertips
*Incorporate a few treasured tchotchkes that make you smile, just be sure they do not interfere with your work surface

I have two baseballs that Kern caught for me (one at a Nationals game and one at a Cubs game) so I kept those, along with my McCarty and Peter's Pottery (Mississippi staples) but just changed the configuration to fit my new items into the space.


 I am pleased with my new nook--I'll have rotating images from our wedding and engagement to enjoy for the next year, along with a few mementos to help bring a smile to my face during those long work days!

Last but not least, if you need some inspiration for a home office, check out my Home Office Pinterest Board, with images and ideas for a lovely and feminine workspace! 

August 18, 2014

Trash to Treasure: Graphite and Pure White Side Table


For this edition of Trash to Treasure, I was given a classic Pottery Barn side table by a friend.  The sleek and modern PB aesthetic doesn't exactly scream French Country so I spent a few days trying to determine the best way to paint it.  French Linen and distressed was definitely not going to look right.


Enter Annie Sloan's Graphite, a shade I recently purchased and have been looking for an opportunity to try.  P.S...can you see my new professional drop cloth in the background?  I decided it was time to graduate from using old towels or random plastic sheets.  Coming up in the world!


I'm a little obsessed with it.  The color is a deep gray and reminds me of (how original) pencil lead.


It's dark and mysterious and has depth, but looks sleek once it has dried. 


I wanted to add another element to the table so I decided to tape off the legs and paint them Pure White.


The result was a two-toned look that added visual interest to an otherwise basic table.


I waxed the entire table with clear wax and did not distress it.


I was pleased with the re-do of my first "modern" piece of furniture.  It's different from the look I typically gravitate towards, but that's the fun challenge of Trash to Treasure: using items that I have and transforming them into pieces that will be loved and used for years to come!

August 04, 2014

Trash to Treasure: Pure White and Duck Egg Blue Armoire

My friend Holly was moving into a new place recently and texted me a photo of an armoire that she no longer planned on using...and asked if I wanted it.

So now the unwanted furniture is coming to me instead of me hunting it down.

Kern and I picked it up and I got to work on it right away, only to discover that it was a little more challenging that I originally thought.


A former owner (before Holly) had used some sort of contact paper or thick wallpaper to cover the top, front doors and the sides.  The paper was pretty...but it was peeling off in several obvious places and I knew I could not repair it.  We removed the peeling paper off the top and the lower portion of the front.  I repaired a few spots on the front doors, but decided not to take it off because I was too nervous that it wouldn't come off completely.


The inside contained great storage!  The right side had a clothing hook installed and the left had four drawers and a cubby.  Endless possibilities!


Thankfully, the paper on top peeled right off.


Since I didn't know exactly how well the paper was going to take to the paint, I decided to paint the entire outside with Annie Sloan's Pure White.  Keeping it in the same color family as the original would make any little discrepancies less obvious.  When I opened the can, the color reminded me of fluffy white marshmallows.

I painted the top, front and sides and then used dark wax on the wood portions which created an all-over creamy two-tone texture.


The strangest occurrence happened with the legs.  There were some brown stains where (I'm guessing) something in the original wood had bled through the current coat of white paint.  I painted the legs three times and the stain kept showing through!  Instead of letting it ruin the piece, I just worked that into my overall scheme--and used the dark wax all over the wood portions.


Once the paper was painted with a fresh coat of Pure White, it looked clean and new.


I did a little test spot on the paper to see how it would react to dark wax and I did not like the result.  I removed the wax and painted over the test spot.


I painted the inside Annie Sloan's Duck Egg Blue--one of my favorite shades!


Despite the challenges and uncertainties of painting over the paper, Chalk Paint triumphed once again in refreshing this piece and bringing new life to an unwanted piece of furniture.


For more tips and tricks on using Annie Sloan's Chalk Paint and wax, including helpful tutorial videos, please visit the Ask for Roses CREATE page here!
 
voyeur porn porn movies sex videos hd porno video