December 19, 2014

A Polar Farewell

This past week has been full of "See you later" moments as I find myself refusing to say "Good-bye" to so many dear friends in DC.

It's become a DC tradition for our friends to gather before we all scatter for the holidays and enjoy a reading of The Polar Express.  In fact, this was the seventh time we have done it!

The theme of the Polar Express can be defined as believing even though others are skeptical.  The reason I love this book is that it reminds me in a child-like way that there is more to hope for than just presents under the tree and more to believe in than the idea of Santa Claus and the North Pole.
This past Sunday at church, we had our yearly service of scripture reading and songs.  The passage that encouraged me the most was an old favorite: Isaiah 9:6-7:

For to us a child is born,
    to us a son is given;
and the government shall be upon his shoulder,
    and his name shall be called
Wonderful Counselor, Mighty God,
    Everlasting Father, Prince of Peace.
Of the increase of his government and of peace
    there will be no end,

on the throne of David and over his kingdom,
    to establish it and to uphold it
with justice and with righteousness
    from this time forth and forevermore.
The zeal of the Lord of hosts will do this.
This Christmas passage make me long, wait and want the second coming of Jesus.  It is designed to point Believers to the reality that we have more than nostalgia--we have true hope and more than tradition--we have salvation--to look forward to.

Just as I was feeling full of hope, but also nostalgia of completing the final reading, our friends surprised us.
 
They signed a special copy of The Polar Express and Jordan put together a movie filled with hundreds of photos from the past 6+ years that we have spent in DC.  I wanted to cry, but chose to laugh, and it was hilarious watching along with our friends as we recalled memories and experiences that we have shared. When I moved to Washington a month after graduating from college in 2008, I never dreamed that I would have the experiences and most importantly the community that I found here.  I will carry these memories and friendships with me for the rest of my life.

So that's it, folks.  Time to head back south now!

Note: If you're having trouble with the video, click here.

November 13, 2014

Love Lock: One Year and Counting!

This weekend, Kern and I will celebrate our first wedding anniversary!


Without a doubt, it has been the most meaningful, fun, lesson-packed and special year of my life.
 
 We've made memories, started new traditions and learned from each other.

When we were in Paris in April, we took a little time to leave our mark on the city at the Pont des Arts.


 Happy One Year to my Favorite Person.   

Here's to many, many more!

September 18, 2014

Shaking up Style and Breaking the Rules with Mondani

I was born a rule-follower.  I enjoy neat lines.  Order calms me.  Rules make sense.

However, there are exceptions to every rule!  Even for this self-proclaimed follower.

Modani, a modern furniture store, designed a "Five Design Rules to Break" challenge.  While I could pick more than one, I'm going to focus on 
#1: Stick to one Style.


It's no secret that I love antique, country-esque furniture and drool over neutral and pastel colors--these themes dominate just about every space that I have ever decorated.


When Kern and I moved into our spacious 700 square foot apartment, I had to select each piece carefully--I did not want every inch to be filled with furniture.  The more I worked with the existing floorspace and the pieces I already owned, I realized that I was drawn to more modern, sleek pieces to balance out the heavy antique-y wood.  Initially, the "keep everything matchy" voice in my head made me nervous to purchase what I truly loved.


I was worried that this modern coffee table would look harsh or strange paired with my painted wood furniture but  I was pleased at how it didn't fight with those furnishings and instead the glass top of minimalist metal legs made the space feel bigger.


The biggest challenge in our small space is getting adequate seating to hold a crowd.  I love having friends over, but the couch and two accent chairs fill up quickly.  There is blank space underneath our window that would be perfect for a bench.


Enter: Modani's Savina Bench in white.  It's the perfect compliment: minimalist design but still has the lovely tufted element on the seat. I am envisioning this as perfect extra seating with a crowd and a makeshift ottoman for my little gray corner chair.

I could also see myself balancing snacks on the leather top!


One of the strangest aspects of our apartment is that the living room has no overhead lighting.  Before I sound like I am complaining about it, let me clarify: I dislike overhead lighting because of the strange angles and shadows that it casts.  I love the soft glow of a good lamp.  There is already one floor lamp in our living area and one small table lamp, but one can never have too many options for good lighting.

That's where the Modani New Tuco White Lamp comes in!


It's simple and practical--it doesn't take up a lot of floor space but the curved shape allows the concentrated light to hang over exactly the right spot--perfect for reading!

Modani has stores all over the U.S...and they are getting one in DC soon.  I can't wait!

The best part about designing a space is making up your own rules.  When it comes to piecing together a room I adore and feel comfortable in, I consider comfort, storage and versatility, but the overarching rule that ties each piece together is that I love it--not the fact that it's all the same style or pattern. 

Have you found this to be true in your own homes?  What encourages you to make bold decorating decisions?

September 03, 2014

Paris Grey Bookcase on Alexandria Lifestyle!

Are you motivated to do a little "back to school" organizing...even if you're not hitting the books this fall?  If so, a bookshelf is a great place to start!


Join me at Alexandria Lifestyle and see the dramatic transformation that Chalk Paint plus a little organization can have on your space!

September 02, 2014

What August Taught Me

For the first 20-something years of my life, August was full of new beginnings, crisp notebooks and freshly minted resolutions to excel in a new school year.  I still get nostalgic when I walk through a store and see piles of school supplies stacked high and endless options of  notebooks and pens for sale.

For the past few years, however, August has been very different.  Because of the nature of my work, August is my break.  August is my time to slow down a little, catch my breath and prepare for a busy fall.  I soak up every last ray of summer--all the way through Labor Day--instead of rushing through summer reading or packing my belongings for school on August 1st.


I've come to accept and love the change and rhythm of August but this month has been markedly different for me.  The most obvious reason being, I'm married now, followed closely by the fact that Kern has been traveling almost the entire month.  Initially it might not sound like that big of a deal, but I have missed him greatly.  The hardest part has been missing him while I have down time and we could be participating in some of our favorite activities or traveling together.

Determined to make the most of my time, I decided to let August be a month synonymous with saying yes.  So what has that looked like for me?

Relationships - I have made it a point to reconnect with friends over the past month.  This has taken different forms ranging from sharing a meal to sending a text message or spending time on the phone.  It has reminded me how easy it is to connect and how frequently I choose not to reach out because I feel tired or overworked.  However, when I do reach out, I am recharged and encouraged far more than when I make an excuse.


Giving Away - I have dedicated several days to going through our apartment and marking items to give away, throw away or sell.  This organization spree snowballed into deep cleaning one day...and boy are the results worth it!  I have a rocking eBay store going, more room in my closets and a squeaky clean living space.  I should dedicate a separate blog post to my recent bend towards living with less because it has been wonderful and eye opening to me how little I (and we) actually need in comparison to all that we own.

Being Alone - The past month has confirmed some growing suspicions I have about my personality: I am much more of an introvert that I realized.  While I certainly love being around people, I do find that I need quiet alone time to recharge, ponder, dream and think.  I have allowed myself to say "no" to some opportunities in exchange for a quiet evening at home by myself, with dinner for one.  I am learning that I need this time.  For me, "alone" time also translates into doing activities just for myself, such as taking an afternoon to visit the Portrait Gallery or walk through the American History Museum.  I enjoy the luxury of going exactly at my own speed and deciding the exhibits I want to view!


God's Timing is Perfect - I sailed through the majority of the month trying to keep busy and anticipating a long-awaited trip back to Mississippi.  The day before I was scheduled to fly home, Gran Fran, my beloved grandmother, suffered a stroke.  Living so far from home can be difficult on a good day and gut-wrenching on a hard day.  I was able to get to her quickly and spend lots of time between the hospital and helping my mom manage the chaos.  She is doing better now and working hard in a rehab facility to be able to go home.  I kept thinking of Proverbs 16:9 "In his heart a man plans his way, but the Lord determines his steps."  

As I enter fall, I want to be more responsive to the situations that God places in front of me and be open and willing to change the plans that I have set for myself.  It's been a great summer and I look forward to the changes of fall.

August 22, 2014

Three Ways to Fix (or Prevent) Your Worst Painting Nightmares

One might assume while looking through Ask for Roses that every piece of furniture I touch magically turns out how I envision it the first time...let me assure you...it doesn't!

There are all kinds of mistakes that occur--no matter how much planning and care go into a project, human error just wins sometimes.  And that is okay.  One of the benefits of my "Trash to Treasure" rehabs is that I am working with a piece of furniture that I received for free, so it has no sentimental or monetary value to me.  This gives me a little more courage to expiriment and not obsessively worry as much as I would if I were painting a table my mother gave me.

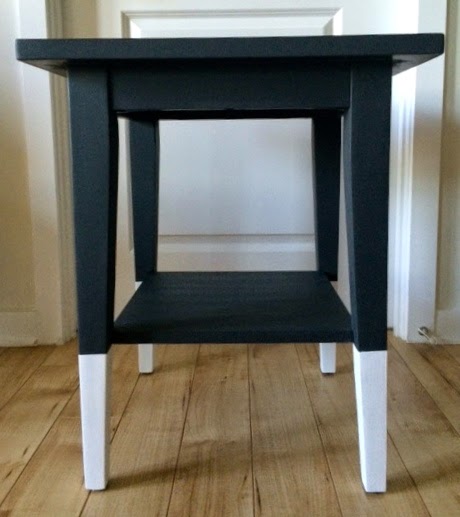
Case in point: the Graphite and Pure White Side Table.  My original idea was to paint the bottom of the legs gold.  I didn't want to use gilding wax, partly because I didn't think that would have the right effect and partly because the tiny pot of gilding wax costs $20.  My solution was to order an inexpensive craft paint that was meant for wood.  The reviews assured me that I would experience a glimmering metallic effect after painting and it worked beautifully on wood.

Would you like to see how that reality played out?

Translate: streaky matte gold paint brush lines.  And this is after two coats. Fortunately, I had the thought to just paint two sides of one leg and see what happened instead of painting all the legs.  Which brings me to:

 Tip #1: If you're experimenting with a new technique, start in a small area first.

The fix for this?

Two quick coats of Annie Sloan's Graphite on this one leg and then two coats on Pure White on all the leg bottoms.  And the result?  A table that looked great and an unnoticable once-was-gold leg.

Tip #2: Be flexible with your vision.

Instead of throwing a tantrum and trying to figure out a way to make the gold work...I just re-evaluated, made the decision to use white (because I had a can of white already available) and no one was the wiser.  In fact, if I wasn't writing this post, would you even know?!


And moving on to one of my favorite pieces of all time: the Washed Armoire.  However, there was a moment when this was not one of my favorite pieces of all time.  And that moment occurred as Kern was putting the doors back on the front (we had removed them to repair the hardware and to paint) and we realized that I had painted the front of the door Louis Blue and the French Linen/Paris Grey wash was on the inside.

Cue black clouds and silence.  To make matters worse, I was almost out of paint.  Lots of deep yoga breathing (that's not technically a tip, but consider it a bonus).

Tip #3: (Preventative) If you take furniture apart, label fronts, backs, sides...anything you are painting different colors.  Even if you think there is no way you could possibly confuse it.

I pulled all of my supplies back out and went to work re-painting the front and back.  I had just enough to finish both sides!


Which door was the disaster?!  (Hint: the one on the left!)

The bottom line to the great world of crafting and DIY is that some things will go wrong.  Some projects will not turn out as planned.  You may even have to walk away, leave the project for a day or two and return to it with a fresh mind.

If you're lucky, maybe you'll even have a few good stories to tell!

August 20, 2014

My Desk at Work: Adding some Flair

For the past five years, my desk at work has looked the same.  I recently decided that I wanted to change a few small features and update my space.  After all, I do spend 45 + hours a week seated in this spot--the least I can do is be surrounded by items that bring me happiness!

Here's the before: nothing wrong with my area, it's just plain!


I typically invest in a new calendar every January, but somehow I let that slip by the wayside this year and reverted to cutting up a calendar I printed off the internet and taping it to my computer monitor.  Very classy, I know.  I knew that I wanted to incorporate some photos from our recent engagement and wedding and enjoy those, but it was difficult to pick just one!


The perfect solution to this problem was to make a calendar that incorporated several of my favorite photos ensuring that I could remove my cut up/taped on calendar and enjoy a new photo each month.

After a thorough internet search, I chose to use Shutterfly to make my calendar.  After browsing through the options, I decided on a simple design: one photo on the left and a basic calendar set up on the right.  I was impressed with Shutterfly's desk calendar selection. Their custom calendar templates enable you to do photo collages, add text and use different filters to create the design and look that you like best.  You can even begin your personalized calendar in the current month...if you want to start enjoying it right away.

I picked all photos of our engagement and wedding...it will be fun to enjoy them over the next year!  Another 'note to self' from this simple project: these calendars would make fantastic gifts!  Filing that one away for later...


Next up: add a little green!  Since the wooden desk belongs to my employer and I can't exactly Chalk Paint my desktop, I decided to paint the pot from an Ikea plant with Annie Sloan's Coco and use some gold gilding on the rim to give it a little sparkle.


Did you know that Chalk Paint can be used not only wood, but also plastic, metal and stone?

I took my standard black post-it dispenser, painted it with Annie Sloan's Pure White and then used gold gilding to rub over the finish.  The result was a funky-distressed-gold post it holder!  Anything is more fun when it's gold--especially when it used to be black plastic!


I have so many more ideas for a desk space, but alas, I must keep my work space in the office professional looking.  However, if you have the luxury of having your own space at home, here are some more suggestions and ideas to get your creative juices flowing for a simple and economical desk makeover:

*Use a lamp - overhead lighting can be so harsh, but a lamp allows you to add character to your space while also bringing more lighting into your area
*Spray paint your scissors, tape dispenser, letter opener and other office supplies gold
*Invest in a candle
*Stack your favorite books under your computer monitor or find some fun bookends to keep inspiration at your fingertips
*Incorporate a few treasured tchotchkes that make you smile, just be sure they do not interfere with your work surface

I have two baseballs that Kern caught for me (one at a Nationals game and one at a Cubs game) so I kept those, along with my McCarty and Peter's Pottery (Mississippi staples) but just changed the configuration to fit my new items into the space.


 I am pleased with my new nook--I'll have rotating images from our wedding and engagement to enjoy for the next year, along with a few mementos to help bring a smile to my face during those long work days!

Last but not least, if you need some inspiration for a home office, check out my Home Office Pinterest Board, with images and ideas for a lovely and feminine workspace! 

August 18, 2014

Trash to Treasure: Graphite and Pure White Side Table


For this edition of Trash to Treasure, I was given a classic Pottery Barn side table by a friend.  The sleek and modern PB aesthetic doesn't exactly scream French Country so I spent a few days trying to determine the best way to paint it.  French Linen and distressed was definitely not going to look right.


Enter Annie Sloan's Graphite, a shade I recently purchased and have been looking for an opportunity to try.  P.S...can you see my new professional drop cloth in the background?  I decided it was time to graduate from using old towels or random plastic sheets.  Coming up in the world!


I'm a little obsessed with it.  The color is a deep gray and reminds me of (how original) pencil lead.


It's dark and mysterious and has depth, but looks sleek once it has dried. 


I wanted to add another element to the table so I decided to tape off the legs and paint them Pure White.


The result was a two-toned look that added visual interest to an otherwise basic table.


I waxed the entire table with clear wax and did not distress it.


I was pleased with the re-do of my first "modern" piece of furniture.  It's different from the look I typically gravitate towards, but that's the fun challenge of Trash to Treasure: using items that I have and transforming them into pieces that will be loved and used for years to come!

August 04, 2014

Trash to Treasure: Pure White and Duck Egg Blue Armoire

My friend Holly was moving into a new place recently and texted me a photo of an armoire that she no longer planned on using...and asked if I wanted it.

So now the unwanted furniture is coming to me instead of me hunting it down.

Kern and I picked it up and I got to work on it right away, only to discover that it was a little more challenging that I originally thought.


A former owner (before Holly) had used some sort of contact paper or thick wallpaper to cover the top, front doors and the sides.  The paper was pretty...but it was peeling off in several obvious places and I knew I could not repair it.  We removed the peeling paper off the top and the lower portion of the front.  I repaired a few spots on the front doors, but decided not to take it off because I was too nervous that it wouldn't come off completely.


The inside contained great storage!  The right side had a clothing hook installed and the left had four drawers and a cubby.  Endless possibilities!


Thankfully, the paper on top peeled right off.


Since I didn't know exactly how well the paper was going to take to the paint, I decided to paint the entire outside with Annie Sloan's Pure White.  Keeping it in the same color family as the original would make any little discrepancies less obvious.  When I opened the can, the color reminded me of fluffy white marshmallows.

I painted the top, front and sides and then used dark wax on the wood portions which created an all-over creamy two-tone texture.


The strangest occurrence happened with the legs.  There were some brown stains where (I'm guessing) something in the original wood had bled through the current coat of white paint.  I painted the legs three times and the stain kept showing through!  Instead of letting it ruin the piece, I just worked that into my overall scheme--and used the dark wax all over the wood portions.


Once the paper was painted with a fresh coat of Pure White, it looked clean and new.


I did a little test spot on the paper to see how it would react to dark wax and I did not like the result.  I removed the wax and painted over the test spot.


I painted the inside Annie Sloan's Duck Egg Blue--one of my favorite shades!


Despite the challenges and uncertainties of painting over the paper, Chalk Paint triumphed once again in refreshing this piece and bringing new life to an unwanted piece of furniture.


For more tips and tricks on using Annie Sloan's Chalk Paint and wax, including helpful tutorial videos, please visit the Ask for Roses CREATE page here!

July 28, 2014

Chalk Paint Makeover: Napoleonic Blue Table

I recently received an email from my friend Jane asking for help and advice on painting a table that she and her husband, Chris, use in the entry way of their home.

The table had belonged to her great-grandmother in South Dakota and it was used to can fruits and vegetables.  Jane's dad was able to squeeze it in the backseat of her car and it's had a new home in DC ever since.  In her email, Jane said she knew she wanted to use Napoleonic Blue - a deep, almost navy color - to match some other interiors in her living room.


After emailing back and forth, it was decided that Jane would stain the top herself and I would come to her home to do the painting and waxing.  She lightly sanded the top and applied a stain and a poly coating to seal it.  She already had a piece of glass cut to protect the top, which really elevated the look of the table.


This piece is a great example of the unpredictability of painting.  If I had wagered a guess, I would have been certain that this table would have needed two coats of paint--since the wood was so light and the paint so dark.  This is what the table looked like after one coat.


For the second coat, I flipped the table over (setting the top on the drop-cloth on the floor) and painting upside down.  This was especially helpful since the legs were decorative--it made it much easier to get all the nooks and crannies.

After a second coat, there were still little bits of the wood showing through!  Jane and I decided a light third coat would be needed.  Sure enough, the third coat yielded a perfect result.

For reference, a 4 ounce test pot covered this entire table three times and we still had a little left over.  And remember: with Chalk Paint, there is no sanding or priming, which is a money and time saver!


Between each coat drying (about 15 minutes per coat) Jane and I sipped coffee, snacked on delicious red cherries and had the best time talking about everything from furniture to weddings to travel.  I even convinced her to re-vamp and paint her china buffet instead of buying a new one (more on that in another post!).

After the last coat was dry, I got out my Annie Sloan clear wax and dark wax and went over the entire piece.  The legs were particularly fun with the decorative woodwork and lots of crevices.


The dark wax toned down the brightness of the paint and gave it a subtle, aged look.  The wax needs about 24 hours to dry and about 30 days total to fully cure.


 This project helped me fall in love with Napoleonic Blue--here is a photo of the side of the table that is close to a window-- you can see how the light made it look a bit brighter.


Since the top was already stained, this entire project only took about 3 hours.  By lunch time on a Saturday, Jane and Chris had a new table.  And the best part?  This table has a story and meaning to Jane.  One of the most rewarding parts about recreating a family piece of furniture is being able to enjoy   the memory of a loved one's table while ensuring that it fits in with your current style and needs.


I call that a pretty successful Saturday morning.  You can do this too!  If you have questions about painting or want to see more examples and tutorials, check out my "Create" page or the Ask for Roses YouTube channel!
 
voyeur porn porn movies sex videos hd porno video